 ILLER
ILLERMaking a bill
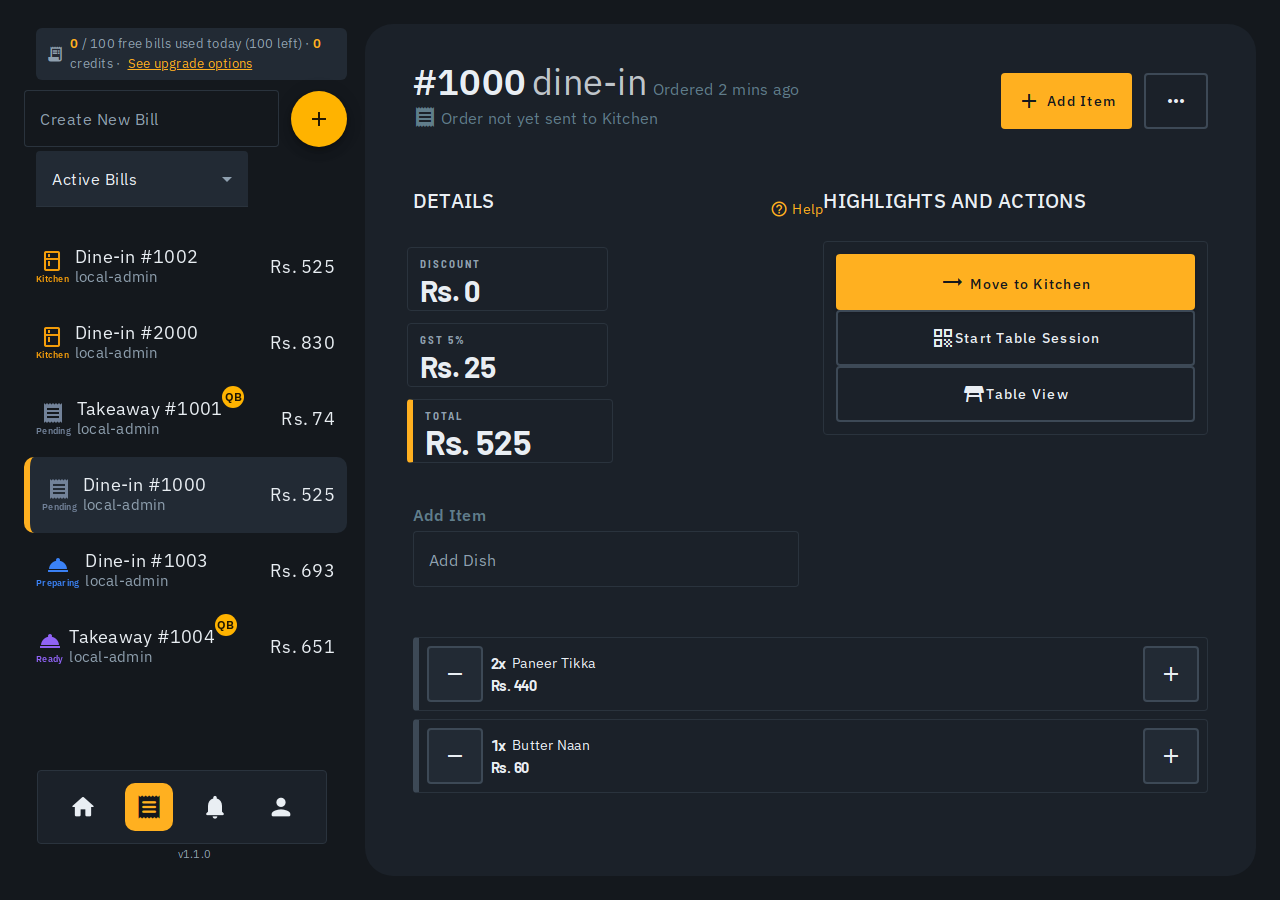
The Bills screen is where every order gets rung up, from opening a table to handing the customer their receipt.
Starting a bill
- In the Create New Bill field (top of the bill list), type a table number or order type -- e.g. "Table 4", "Swiggy", "Zomato" -- and pick a match from the dropdown, or select Create new table/counter "..." to add one on the fly.
- Tap the + button next to the field. The new bill opens on the right.
Adding items
- Use Add Dish to search any menu item by name or code -- or type a category name (e.g. "Starters") to see every item in that category, without needing to browse the category chips first (GH #119).
- Alternatively, tap a category chip under Most Used Items to browse and tap items straight onto the bill. The chip row scrolls sideways in a single compact line, so it stays quick to use even with many categories.
- Each added item appears in the bill's item list with a quantity -- use the +/- controls on a row to adjust how many, or remove it entirely. Once an item has been sent to the kitchen, reducing its quantity asks for a reason first -- see "Cancelling an item" below, which covers this too.
On a tablet held landscape or a desktop screen, Add Dish and the bill's item list sit side by side, so you can search/browse and watch the running bill update at the same time. On a phone (or a tablet in portrait), they stack instead -- Add Dish above the item list -- same controls either way.
Taxes, discount and total
The Details panel keeps a running summary as you add items:
- Discount -- always Rs. 0 today; discounts aren't a configurable feature yet (see the Discounts help article).
- Taxes -- one row per tax/charge that applies to this bill's type (set up under Outlet; see the Taxes & charges help article).
- Total -- the grand total, updating live as you add or remove items.
Cancelling an item
If an item on the bill needs to come off after it's been sent to the kitchen, tap the small cancel icon on that row instead of just reducing its quantity to zero -- this keeps a proper record of what happened and why.
Reducing the quantity of a sent item works the same way. Once an item has gone to the kitchen, tapping its - stepper opens the same reason sheet instead of silently dropping the quantity -- a partial reduction (say, 5 down to 3) is still a partial cancellation of real food, so it needs the same justification. Only waiters, cashiers and admins can do this; it's enforced on the server, not just hidden in the app. Items that haven't been sent yet still adjust with no prompt at all, same as always. Reducing an item down to its very last unit opens the full cancel sheet below instead of a separate "reduce to zero" flow.
The sheet that opens auto-detects which kind of cancellation this is, based on how far the item has already gotten in the kitchen:
- Void -- the item hasn't started preparing yet (never sent, or sitting at "sent"). No food cost, no approval needed -- waiters and cashiers can void an item themselves. The kitchen is notified immediately.
- Waste -- prep has already started ("preparing" or "ready"). Real food cost was incurred, so this requires an admin to confirm for a FULL cancellation. If a waiter/cashier tries to cancel an item past this point, the sheet tells them to ask an admin instead of letting the cancellation through. (A partial quantity reduction of a "preparing"/"ready" item is still recorded as a waste for the removed units, but does not itself require admin approval -- only fully cancelling the item does.)
Either way, a reason is required before you can confirm -- pick one of the quick options (Customer changed mind, Wrong order, Long wait, Kitchen error) or type your own. The reason is kept on record against the item, not just discarded.
A cancelled item is never deleted from the bill -- it stays visible, struck through, with a VOID or WASTE tag (hover/tap it to see the reason), on this screen, the kitchen board, and the kitchen ticket wall. See the Kitchen ticket wall help article for how it looks from the kitchen side. A partial quantity reduction keeps the item live at its new (lower) quantity -- it isn't struck through, but the reason is still kept on record.
Sending to the kitchen and completing the bill
The action button at the bottom of the Highlights and Actions panel walks the bill through its stages:
- Move to Kitchen -- sends the order to the kitchen ticket wall/board once the bill has at least one item.
- Update -- re-sends the ticket if you edit items while it's still in the kitchen or being prepared.
- Delivered -- once food is ready and handed to the customer.
- Complete -- settles the bill. This needs a valid customer name (and phone/email, if you've asked for one) filled in first.
Sharing the bill with the customer
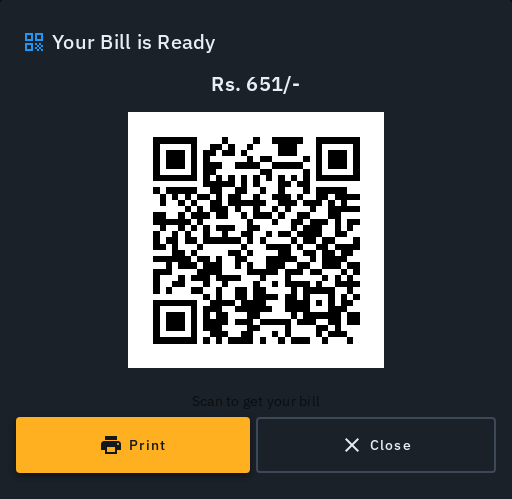
Once a bill is Completed, the action button becomes Show QR -- tap it to open a sheet with a QR code sized to the bill total. The customer scans it on their own phone to view (and, from there, share on WhatsApp themselves) their bill. The same sheet also has a Send on WhatsApp button so you can send the bill link yourself -- it opens WhatsApp pre-addressed to the customer's number when you've captured one, or WhatsApp's own contact picker otherwise -- and a Print button if you'd rather hand over a printed thermal receipt instead -- see the Printing your bills help article for printer setup.
Guided tour
The first time you open a bill on this screen, a short guided tour walks through the core flow above -- add a dish, adjust its quantity, send it to the kitchen, then print/settle. It only shows itself once; if you want to see it again (or missed it), open the "..." menu and pick Take a Tour.
Tips
- Cancel Bill (from the "..." menu) cancels the WHOLE bill, before it's completed -- for cancelling a single item instead, use that item's own cancel icon (see "Cancelling an item" above).
- Table View (button below the action button) shows who's ordered what across a table's session, once a customer has started one themselves. Customers start their own table session by scanning the table's QR code -- there's no separate "start it for them" action on this screen.
- A bill can't be completed with a blank or invalid customer name -- fix the highlighted field and the action button re-enables.